The 5 Steps That Will Help You Avoid The Dreaded “NAS Migration Failure”
So you need to migrate your file data to a new platform. Take comfort that you are not alone –many have been in your position and snatched success from the jaws of failure. The information that follows is designed to walk you through the process of what a file-based data platform migration looks like.
If you have been through a migration before, then you’re already aware of the pitfalls and risks (corrupted data, time over runs, budget over runs, etc.) that can lead to a failed migration effort. If you’re new to the process, then a quick click on this link will give you the high level overview of what it can look like in a lighthearted way. Ok, Ok, maybe 100 drunken clowns with bees in their underpants is a bit over the top, but trust me, when you’re in the middle of a failing migration, you’re looking for some comic relief. Not sure what I mean here – you didn’t click the link did you?
Regardless of where you might look for information on what causes migration efforts to fail, you’ll find that the primary reason is a lack of a foundational understanding of the process and appropriate expertise.
This makes complete sense because how often do you find yourself doing NAS data migrations? Depending on your organization’s size, you may be migrating data once or twice a year as business decisions or technology retirement force a platform change. Regardless of your organization’s size, this lack of frequency can make it feel like you’re re-inventing the wheel with each migration event, thus opening the door to potential issues.
First up, hit the expert button
If you were going to have surgery, would you want to go with the surgeon who is doing this for the first time or maybe one who has significant experience doing your exact procedure? I want the guy who’s performed it hundreds, if not thousands of times. While not as immediately scary as surgery, the same is a valid conclusion for a migration. When you have a project with considerable risk that requires specific expertise that you don’t have in-house, and the project has a limited scope, you bring in a project specialist to execute it. For this type of project, you need a Datadobi Certified Migration Specialist; someone who has the experience to ensure the success of your project and gives you the peace of mind that it is being handled by an expert.
Next, you have to Understand the Overall Process
The 5 steps – lots to do
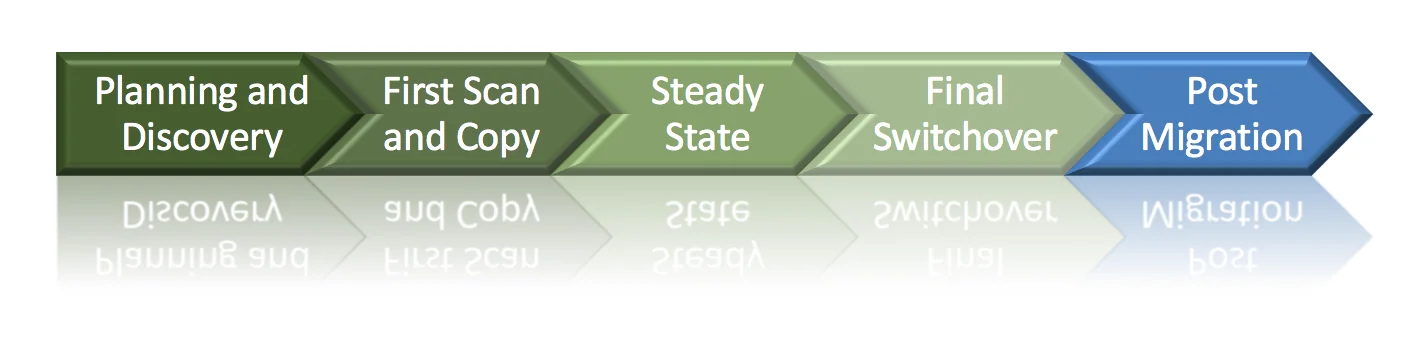
Planning and Discovery
The first step requires getting organized and answering a variety of questions – your Datadobi team will help in this area by giving you a questionnaire. This helps them better understand your environment and gives you a clearer understanding of what you have to work with. Some typical things you will need to know or discover –

- The source and target systems – this may be pretty straightforward
- What data actually needs to be migrated – everything, or can you retire some of that older data no one has touched in over 7 years?
- Will you be migrating over a LAN or WAN link? And how fast are the links?
- How much data is there and what is its makeup?
- Size (this is important as it can drastically affect migration performance)
- NFS and/or SMB or Mixed Protocol
- What applications and application groups will be impacted?
- Does data need to be migrated in a specific order or in parallel?
- How long will the overall migration take?
- How long will the final switchover to the new system take?
- Will all the capacity be switchover at once, or in stages?
- What is your outage tolerance for the final cutover?
- What is the business impact of delaying migration efforts vs the cost impact of leaving old gear on the floor?
- Who will perform the migration and what method will they use?
- Answered above of course if you’re looking for the best possible outcome
DobiMigrate will do discovery of high level source and target information as well as all shares and exports during the initial configuration of your source and target systems into the tool, so if you are looking for this level of information DobiMigrate can help with that.
First Scan and Copy
Once you have a good understanding of what you have, what you need to put in place and what it is going to take to complete the migration, you will want to move an initial set of data (files and associated permissions) to the target. This process can take a significant amount of time even when using a performance optimized tool like DobiMigrate due to the simple physics of moving large amounts of data from one system to another. Let’s say that you have 100TB of data sitting on a NAS device that needs to be moved, this could take anywhere from 14 to 18 days or more; so not something that’s going to happen over a weekend. There are several mitigating factors that impact the transfer rate such as network pipe size and usage, load on the source system and the number of small files vs large files. Fortunately, DobiMigrate provides mechanisms for throttling both network usage and load on the source system to ensure that this part of the process does not impact your day to day production efforts.
Steady State
After the first scan and first copy operations have completed your migration enters into the stage known as Steady State, this is a critical stage as it is designed to provide three key things:

- First, Steady State provides a continuous mirroring of the data on the source and target systems. This can go on for days, week, or months while business details and timing decisions are worked out regarding redirecting applications and end users to the new system.
- Second, this is your opportunity to address any errors that are taking place as data is being copied. Errors are not uncommon and they will help you identify data that won’t copy properly so that corrective action can be taken if needed. Some good examples of errors you may see are character set conflicts and an inability to access a file on the source system.
- Third, this stage gives you the opportunity to identify important information about the Switchover step, specifically how long the switchover will take. You can even do a Dry Run of the switchover within DobiMigrate to get a good understanding of how long the final scan and copy should take. This information may be useful as you make decisions about whether to cut everything over at one time or switchover data in stages.
Final Switchover
Finally, the big day has arrived, you are ready to cut over your data to the new system. The first consideration for the switchover needs to be limiting end user access to the source data so that no source changes take place that don’t make it to the target. For those systems that DobiMigrate has API integration with (EMC Unity, EMC VNX, EMC Isilon and NetApp) setting shares and exports on the source to read only can be done directly within the migration tool, for other systems you will want to have planned time to do this via a script or manually.

During the cut over all data will be scanned on both the source and target to identify what needs to be moved in this final pass. The final copy pass will include copying over to the target any data that has been excluded in previous attempts – perfect opportunity to get any of those files that couldn’t be moved earlier due to open file handles and those that got skipped due to constant updates. The short of it is the Final Switchover will capture all files. Typically, the lengthiest part of this process is scanning the data on both systems as most of the data already resides on the target and only a relatively small amount of data should be left to copy, but this can vary based on your file change rate.
Once the final copy is done you will want to create the SMB shares and/or NFS exports on the target and make them read and/or write depending on what existed on the source system. If DobiMigrate is being used to create the SMB shares all share level permissions that exist on the source will be assigned to the newly created or updated share on the destination. Likewise, for NFS exports, DobiMigrate will read all the export settings (client IP lists, etc.) and assign these to the destination as well. All of this can be done within DobiMigrate as a final migration step.
There is an excellent post by Blake Belongia focusing specifically on the Switchover topic, you can read it here.
Post Migration
So your final copy of data has been placed on the target system, now what? Post migration efforts take place outside of DobiMigrate and a good first step would be to do some quick validation testing to make sure you are happy with what you have in terms of files, file permission and share / export access rights on the target system. Having key application owners test their apps as well as a few key end users checking home shares, etc. are also a good idea.
Once you are happy with the condition of your data you will need to redirect your users and applications to the new source. This can be done via DFS or DNS changes depending on your environment and in some cases may be accomplished by forwarding new links to your users if that is your preference.
Congratulations – a successful migration!
There you have it – to sum things up – you need an experienced migration expert and a good understanding of the 5 steps of the process; hopefully this post was helpful in regard to the process.
For more details, plan a call with the Datadobi sales team in your area by making a request to [email protected].
Best of luck to you and happy migrating!